Autoscaling Applications on Kubernetes - A Primer
Kubernetes provides different capabilities in terms of scalability. This primer is the first part of a series that introduces you to concepts and how to scale your cluster & applications.

TL;DR - Kubernetes provides different capabilities in terms of scalability. This primer is the first part of a series that introduces you to concepts and how to scale your cluster & applications.
This year I've started working with Kubernetes and one of my main focuses has been scalability and how it impacts your application & infrastructure design. It's an interesting space to look into, certainly if you add autoscaling to the mix.
This series will walk you through the basics of the scalability aspects in Kubernetes and give you an idea of what it provides, how you can use it yourself and how you should design your applications to build your own scalable applications.
The series is divided into the following parts:
Here is an overview of the whole series:
- Part I - A Primer
- Part II - Cluster Autoscaler
- Part III - Application Autoscaling
- Part IV - Scaling based on Azure metrics
- Part V - Autoscaling is not easy
This first article will explain what components are available in Kubernetes, how you can perform manual scaling activities and how you should design your application for in order to be fully scalable.
Scaling Kubernetes
In Kubernetes there are two main areas where it provides scalability capabilities:
- Cluster Scaling - Add and remove nodes to the cluster to provide more resources to run on. This sort of scaling is done on an infrastructure level.
- Application Scaling - Influence how your applications are running by changing the characteristics your pods. Either by adding more copies of your application or changing the resources available to run on.
However, before you can start scaling on an application-level, we first need to make sure that our cluster is providing enough resources to satisfy the application scaling needs. Let's have a look at scaling our cluster manually.
Scaling Clusters
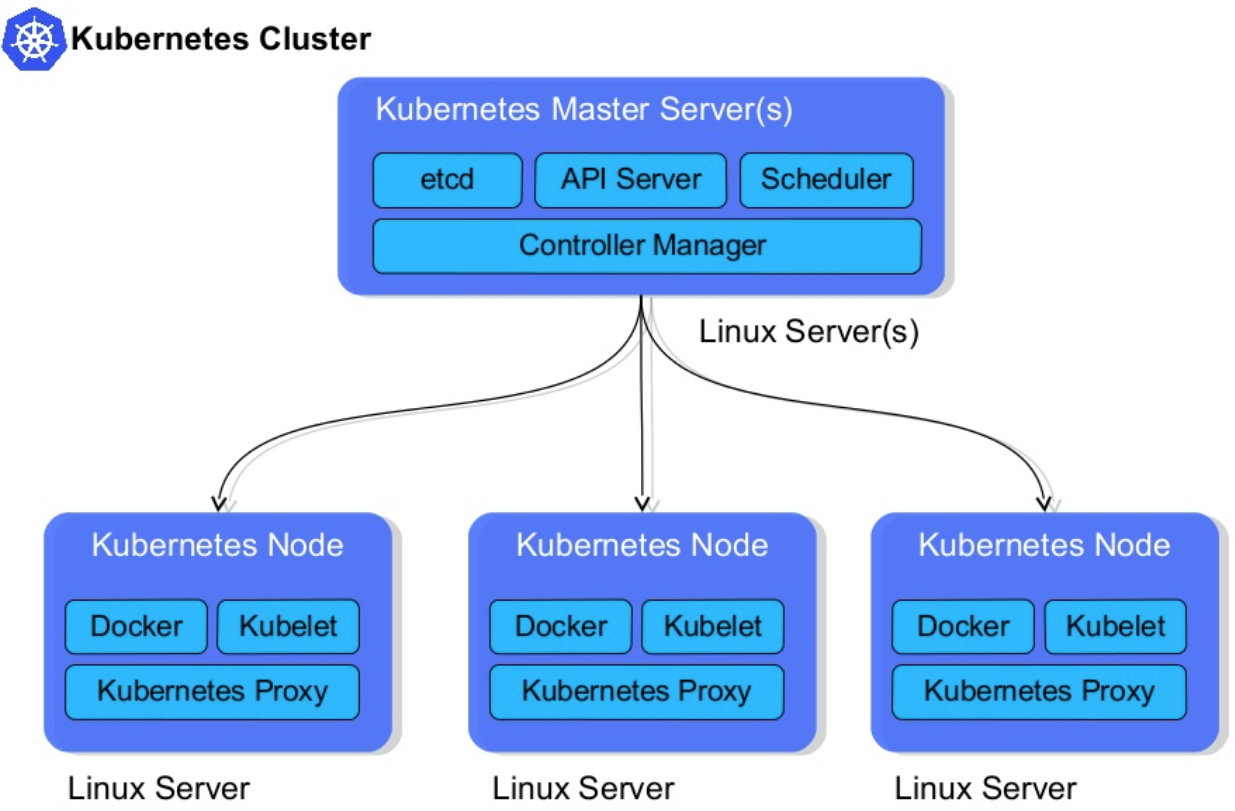
Kubernetes clusters consist of two types of nodes - Master & worker nodes.
While the master nodes are in charge of providing a control plane for the cluster, managing the worker nodes and making sure everything runs smoothly inside of the cluster; the worker nodes are what we need to scale.
These worker nodes are the nodes that will run your effective workloads. Every node runs a kubelet which is an agent that is used by the master node to manage workloads running on this node.
More details about how the cluster works are beyond the scope of this post, but you can read more about it here.
Here's a visual overview by Steve Watt:
In order to provide enough resources for our applications, we need to make sure that our cluster has enough worker nodes to run all the applications on.
Ideally, this is done before the cluster is reaching their limits. When we are overprovisioning the cluster, we should remove nodes so that we are not burning money without a cause.
Manual Scaling
Most cloud providers allow you to easily perform these scaling operations with a single command.
Here is an example of how you scale your Azure Kubernetes Service cluster: (docs)
az aks scale --name containo-cluster --resource-group containo-infrastructure --node-count 5
If you are running a bare-metal cluster, it is your responsibility to provision, manage and add nodes to the cluster.
Scaling Applications
Now that we know how to scale our cluster to provide the resources that we need, we can start scaling our applications.
In order to do this, our application needs to be thought through and designed to be scaled.
Application Composition
The success of your scalabilities lies in your application composition and is crucial for building high-scale systems.
In Kubernetes, your scalability unit is what is called a Pod. It is capable of running one or more containers which will be running next to each other on the same node.
Pods are being deployed & managed when you create a Deployment. This specification will define what a pod is and what characteristics it needs and how many running replicas of them are required. Behind the scenes, the deployment will create a Replica Set to manage all the replicas for the deployment.
However, it is not recommended to create & manage your own Replica Sets but to delegate this to the Deployment as this has more of a declarative approach.
Example Scenario
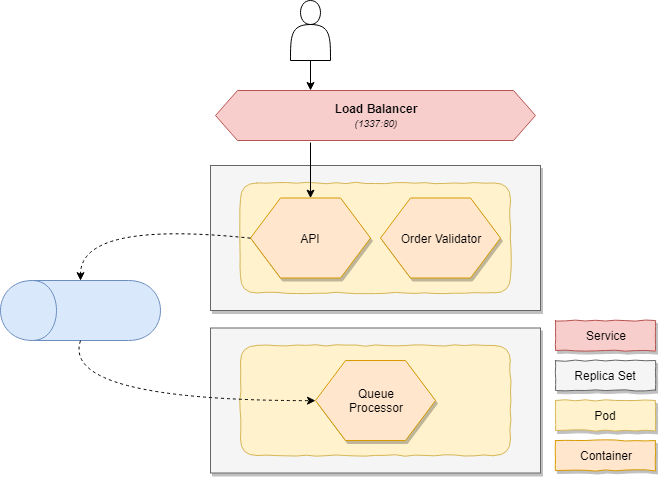
Imagine that we have an order microservices which exposes an HTTP endpoint to provide functionality to our customers. For every new order, we will validate it and store it. To achieve this, we will offload the persistence to a second process which will take our orders of a queue and persist them in an asynchronous manner.
In our scenario we can identify two components:
- An API that is our customer-facing endpoint
- Our order queue worker that is handling & persisting all orders
These two components also have their own scaling requirements - Our API will have to scale based on CPU & memory while our order queue worker will need to be scaled based on the amount of work that is left on the queue.
This will instruct the deployment, which is actually updating the Replica Set, to change the number of requested replicas.
In my reference application, you can find an example of the Order service running on Kubernetes.
It consists of two pods:
- A frontend pod which runs the API container with a validator sidecar
- A backend pod which is running the queue worker
Deploying pods
For the sake of the blog post, we will only deploy the queue processor but if you are interested, everything is available on GitHub which explains how you can deploy it yourself by following these instructions.
In order to deploy our processor, we need to describe what it looks like and how it should behave. We want to deploy a pod which is running the tomkerkhove/containo.services.orders.queueprocessor Docker image.
Next to that, we want it to run 3 exact replicas of our pod and use rolling updates as our deployment strategy.
It uses the following deployment:
apiVersion: apps/v1
kind: Deployment
metadata:
  name: containo-orders-queue-processor
  namespace: containo
spec:
  replicas: 3
  strategy:
    type: RollingUpdate
    rollingUpdate:
      maxSurge: 1
      maxUnavailable: 1
  selector:
    matchLabels:
      app: containo
      microservice: orders
  template:
    metadata:
      labels:
        app: containo
        microservice: orders
    spec:
      containers:
        - name: containo-orders-queueprocessor
          image: tomkerkhove/containo.services.orders.queueprocessor:0.1.0.30
          env:
          # Environment variables are redacted given it is not relevant
          - name:  ASPNETCORE_ENVIRONMENT
            value: Development
If you are interested, I recommend reading this blog post by Etienne Tremel.
We can easily deploy our deployment specification by using kubectl:
kubectl apply -f kubernetes-orders-declaration.yaml
Once that's finished you can view the state of your deployment by running:
⚡ tkerkhove@tomkerkhove C:\scaling-kubernetes
❯ kubectl get deployments --namespace containo
NAME                              DESIRED   CURRENT   UP-TO-DATE   AVAILABLE   AGE
containo-orders-queue-processor   3         3         3            3           8m
You can find more information about creating deployments in the Kubernetes documentation.
Scaling pods
Once your deployment has been created, manually scaling the amount of pods instances is actually very easy:
kubectl scale deployment containo-orders-queue-processor --replicas=10 --namespace=containo
That's it! The deployment will instruct the replica set to change the desired amount of instance which will request Kubernetes to either provision more instances, or instruct running pods to gracefully shutdown.
If you get the latest status of your deployment again, you'll notice that it has changed the desired amount and is gradually adding new pods:
⚡ tkerkhove@tomkerkhove C:\scaling-kubernetes
❯ kubectl get deployments --namespace containo
NAME                              DESIRED   CURRENT   UP-TO-DATE   AVAILABLE   AGE
containo-orders-queue-processor   10        10        10           3           11m

⚡ tkerkhove@tomkerkhove C:\scaling-kubernetes
❯ kubectl get deployments --namespace containo
NAME                              DESIRED   CURRENT   UP-TO-DATE   AVAILABLE   AGE
containo-orders-queue-processor   10        10        10           6           11m

⚡ tkerkhove@tomkerkhove C:\scaling-kubernetes
❯ kubectl get deployments --namespace containo
NAME                              DESIRED   CURRENT   UP-TO-DATE   AVAILABLE   AGE
containo-orders-queue-processor   10        10        10           8           11m

⚡ tkerkhove@tomkerkhove C:\scaling-kubernetes
❯ kubectl get deployments --namespace containo
NAME                              DESIRED   CURRENT   UP-TO-DATE   AVAILABLE   AGE
containo-orders-queue-processor   10        10        10           10          12m
Conclusion
We've learned that Kubernetes requires you to scale your cluster to provide enough resources for your application. Applications also need to be designed to be scalable and we've used an example scenario which shows you a potential approach to design, deploy and scale it.
While we are now able to manually scale our cluster & applications, you do not want to be constantly monitoring them and wake up in the middle of the night to scale them.
In our next post, we will have a look how we can automatically scale our Kubernetes cluster to ensure that it always provides enough resources for our applications.
Thanks for reading,
Tom.