Autoscaling your platform with Azure Monitor
TL;DR - Autoscaling is a great way to not only optimize your costs but also a flexible way of doing asynchronous processing.We will look at how Azure Monitor Autoscale allows you to define autoscaling rules, what the caveats are and what would be good additions to the service
Building scalable systems is crucial for any cloud platform.
One way to achieve this is to decouple your frontend nodes from your backend processing by using the Competing Consumer pattern. This makes it possible to easily add more processing instances (scale out) when the workload is growing, being messages filling the queue.
Automating things is always great, but it is crucial to be aware of what is going on in your platform. This is often forgotten about but should be part of your monitoring as well.
Once everything is setup you can save money by optimizing your resources based on your needs, instead of overprovisioning.
A question I have received a couple of times is - Great! But how do I do that?
Enter Azure Monitor Autoscale
Azure Monitor Autoscale enables you to define rules that will automatically scale your workloads based on specific metrics.
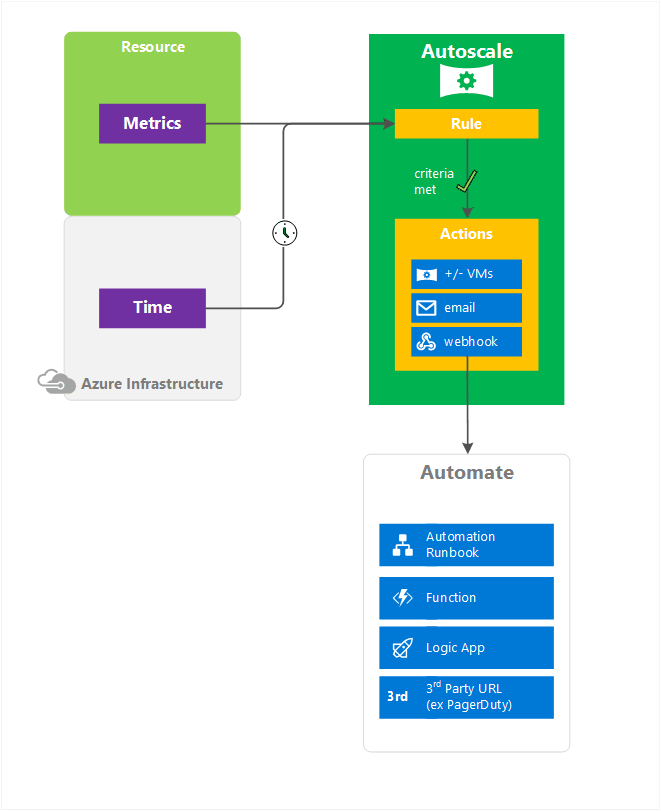
These metrics can be Service Bus Queues, Storage Queues, Application Insights, custom metrics and more. Currently, Azure Monitor Autoscale is limited to workloads running on Azure Cloud Services (Yes, you've read that right!), App Service Plans and/or Virtual Machine Scale Sets.
When more advanced autoscaling rules are required you can define multiple autoscale conditions. This allows you to vary your scaling based on day of the week, time of day or even date ranges.
This makes it really great because this allows you to have more aggressive scaling over the weekend when more people are buying products than during working hours. The date ranges are also interesting because you can define specific rules for a specific period when you are launching a new marketing campaign and expect more traffic.
Configuring autoscaling for an Azure Service Bus Queue
Sello is hosting an online platform for selling items online and would like to improve their scalability. To achieve this, they want to start autoscaling their worker role based on the message count of their Service Bus queue.
In order to configure it, we need to go to "Azure Monitor" and click on "Autoscale". There it will give you an overview of all resources that can be autoscaled and their current status:
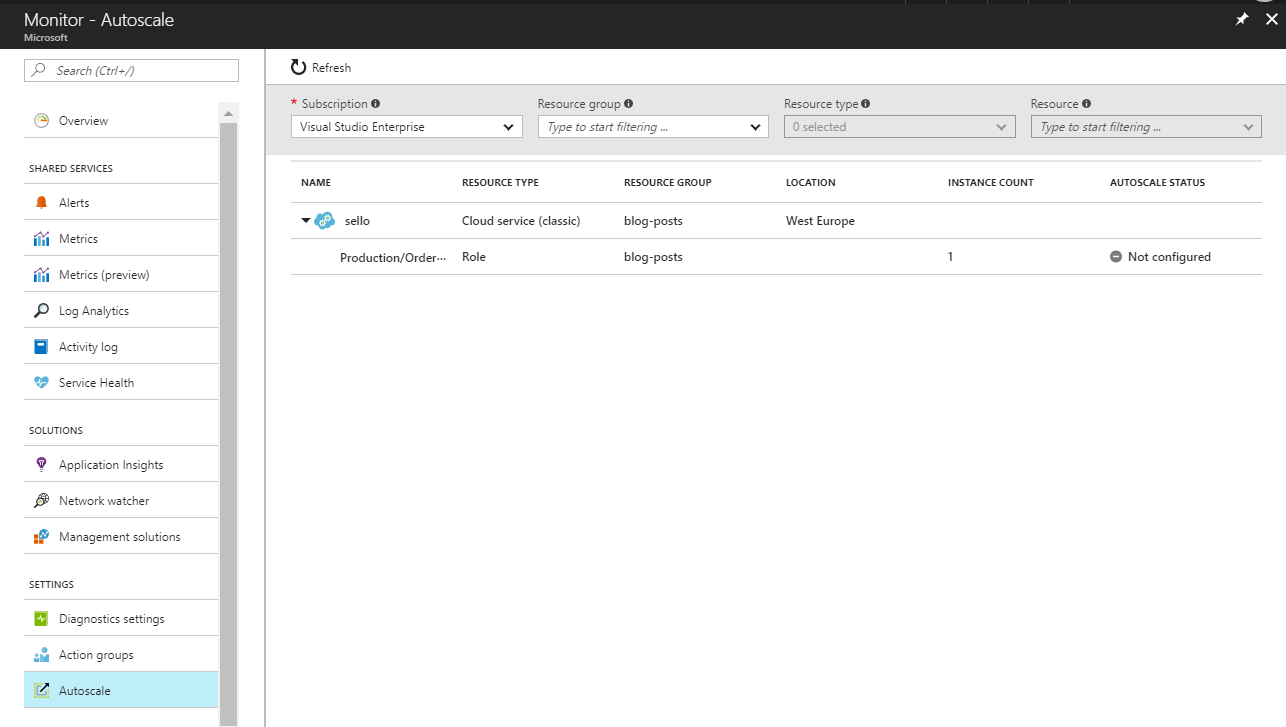
As you can see, there is no autoscaling configured which we can easily add by clicking on the specific role we'd like to autoscale.

When no autoscaling is configured you can easily change the current instance count, or you can enable autoscaling and define the autoscaling profile that fits your needs.
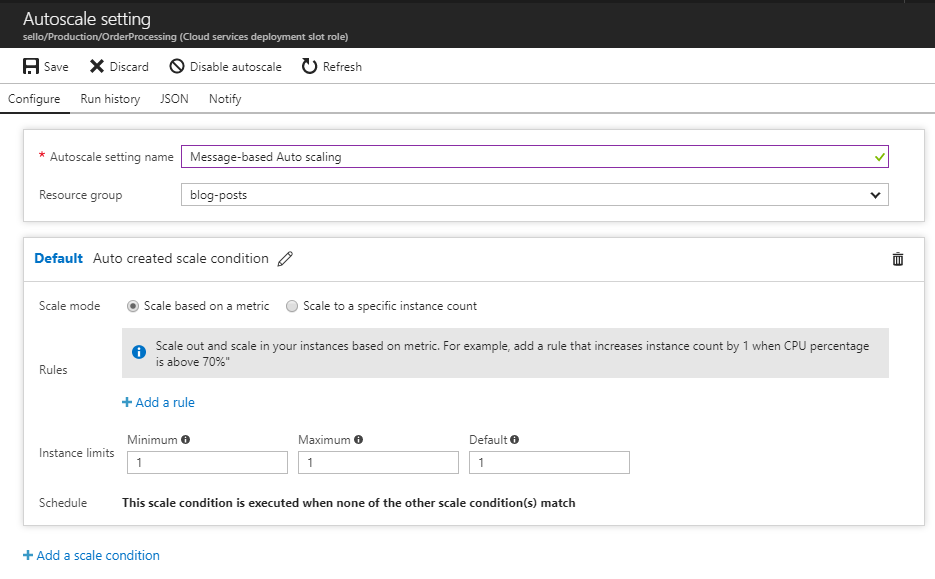
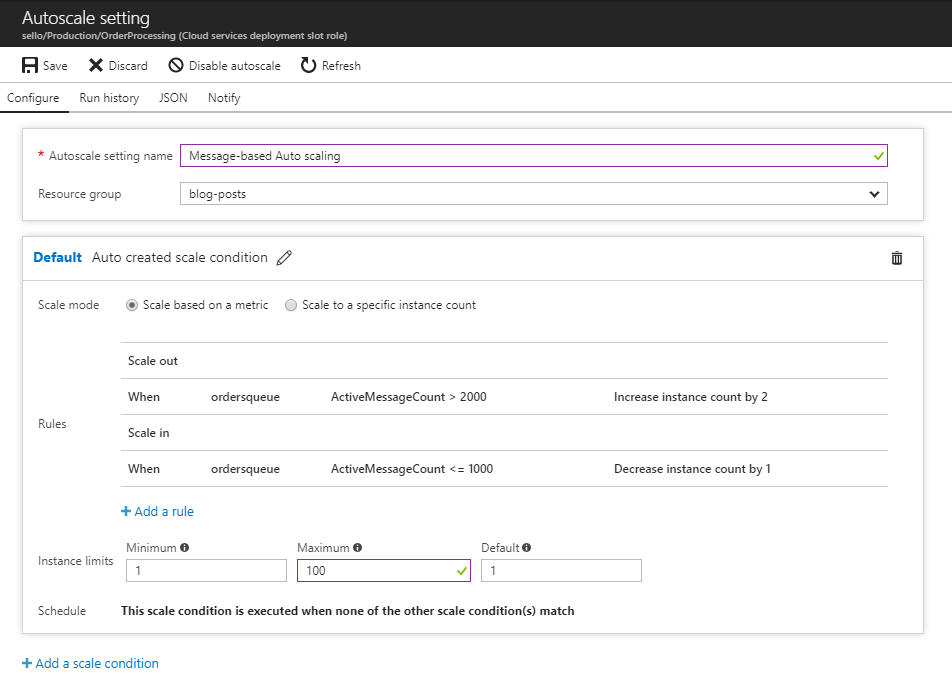
Each autoscaling condition has a name and contains a set of scaling rules that will trigger a scaling action. Next to that, it provides you the capability to limit the instances to a certain amount of instances.
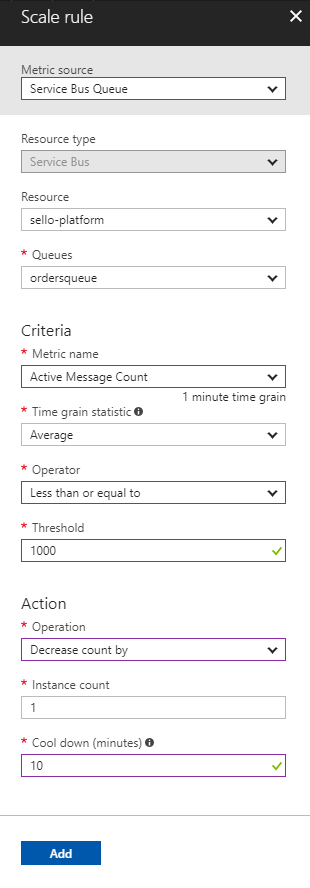
When adding a scale rule you can select the metric you want to scale on and basically define the criteria that triggers the action you want to perform being scaling up or down.
By using a cooldown, it allows your platform to catch up after the previous scaling activity. This is to avoid that you add more instance again, while the previous scale action has actually already mitigated it.
In this case, we're adding a rule to add 2 instances when the active message count is greater than 2000 with a cooldown of 15 minutes.
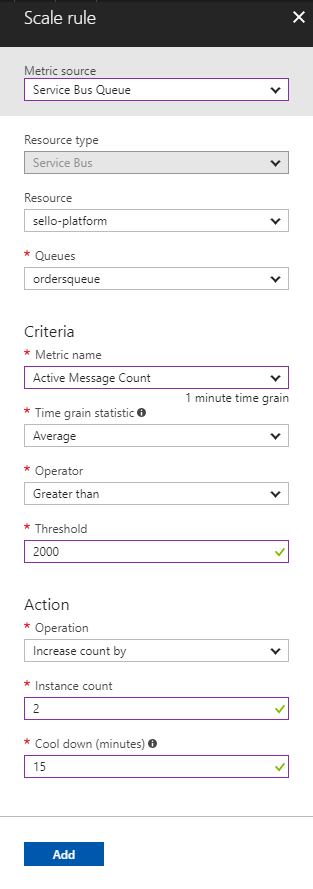
Scaling out is great, scaling in is even better! Just follow the same principle, here we're scaling 1 instance down when the criteria are met.
Once everything is configured, your role will start autoscaling and the configuration looks similar to this:
Creating awareness about autoscaling
Woohoow, autoscaling! Awesome!
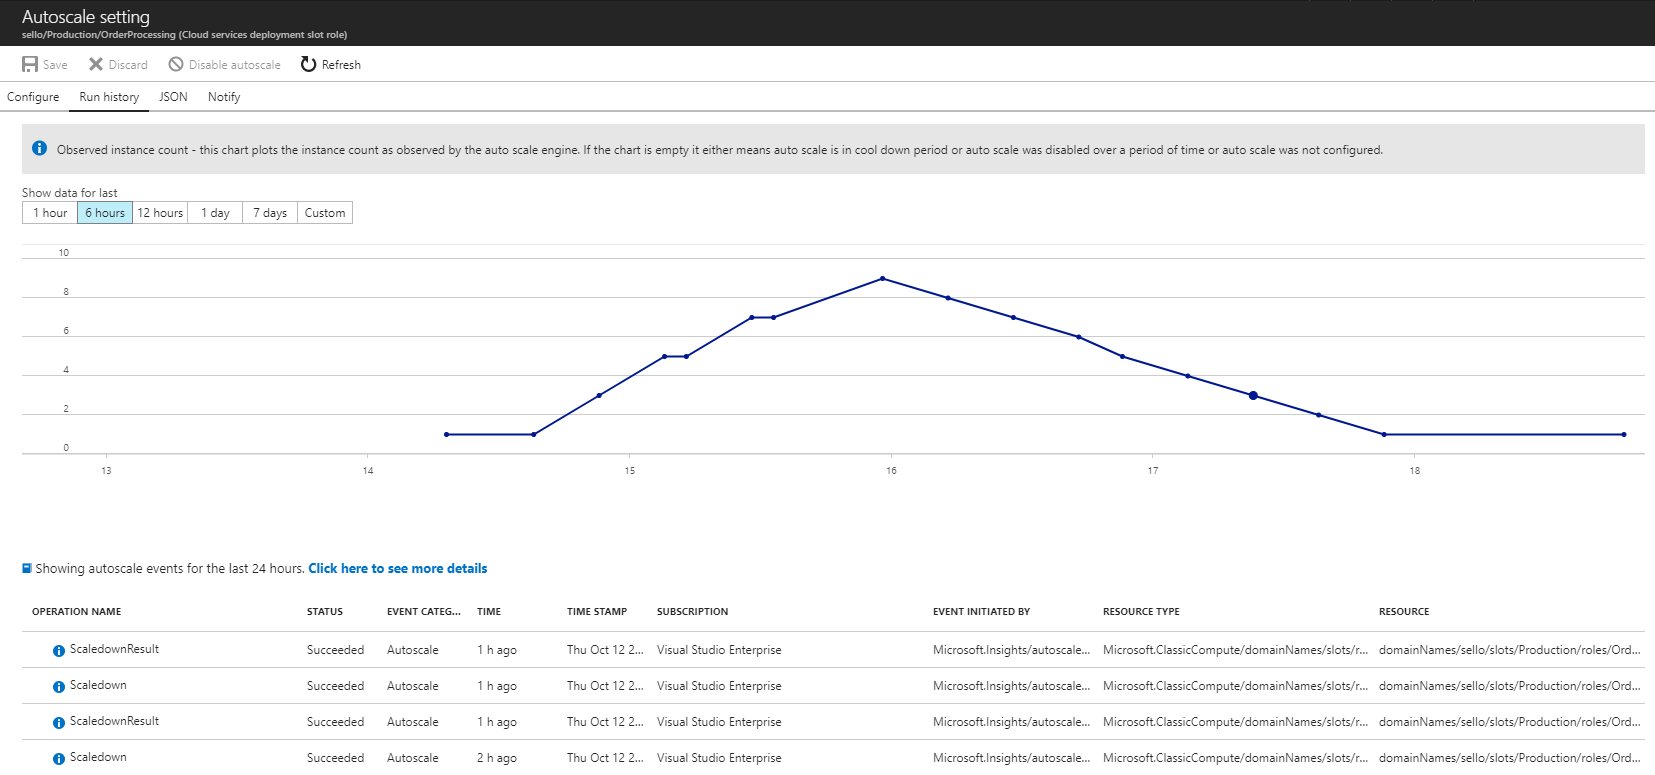
Well - It's great but not done yet. Be aware of how your platform is autoscaling. By using the Run History you can get an overview of your recent scaling activities and learn from it. Creating scaling definitions is not an easy thing to do and should be re-evaluated frequently.
As you can see below, we can handle the load without any problem but it can be improved by scaling down more aggressively.
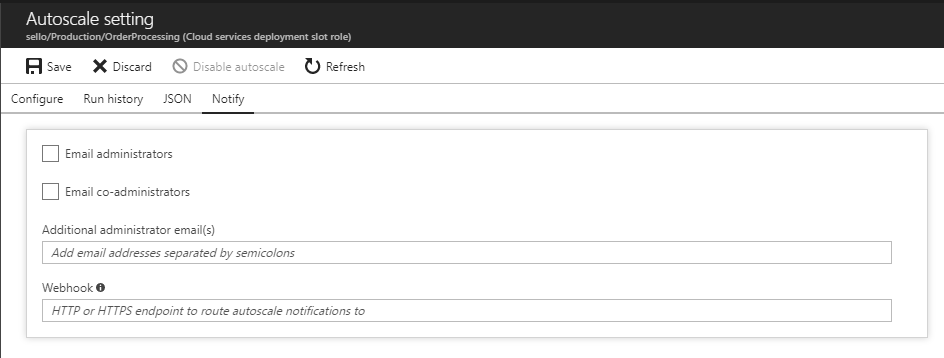
A more proactive way of monitoring this is by using notifications where you can either use email notifications or trigger an HTTP webhook when scaling action is happening.
This is very handy when you want to create awareness about these actions - An easy way to achieve this is to create a Logic App that handles these events, similar to how I did this for Azure Alerts.
You can use one centralized handler for this or create dedicated handlers, based on your use-case. I personally prefer to use on centralized handler because it makes it easier to maintain if the handling is the same for all.
When we put everything together, this is a high-level overview of all the settings for Autoscaling.
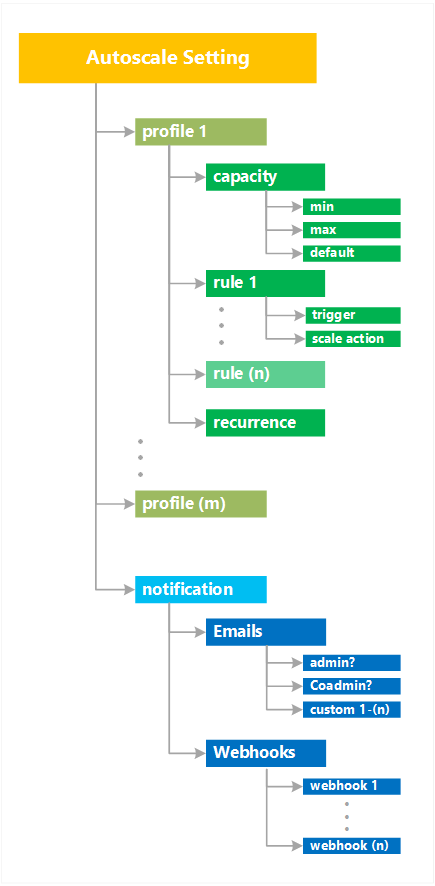
If we were to add a new autoscale condition, we'd have to specify the period in which it would be in effect and basically ignoring all other scaling conditions.
Caveats
Defining autoscaling rules are not easy and they come with a few caveats:
Be careful what metric you are autoscaling on and make sure that it's the correct one. Unfortunately, I've seen a case where we were stuck in an infinite scaling loop because we were autoscaling our worker roles based on the Message Count of a Service Bus queue. However; Message Count not only includes the active messages but also the dead-lettered messages which weren't going away. What we actually ended up with was changing our autoscaling metric to Active Message Count which is what we were interested in here.
This brings me to monitor your autoscaling - This is not only important to detect issues as I've just mentioned but also to learn how your platform is scaling and continuously improve your scaling criteria. It is something that needs to grow since this is use-case specific.
Protect your budget and include instance limitations on your autoscaling conditions. This will protect you from burning your resource costs in case something goes wrong or if having to wait a little longer is not a problem.
Taking autoscaling to the next level
Azure Monitor Autoscale is great how it is today, but I see a couple of features that would be nice to have:
- Scaling Playbooks - Similar to Azure Alerts & Security Center's Security Playbooks, it would be great to have native integration with Azure Logic Apps which makes it not only easier but also encourages people to use a centralized workflow of handling these kinds of notifications. Next to that, it also makes it easier to link both resources together, instead of having to copy the URL of the HTTP connector in your Logic App.
- Event-Driven Autoscaling - The current autoscaling is awesome and it provides a variety of metric sources. However, with the launch of Azure Event Grid, it would be great to see Azure Monitor Autoscale evolve to support an event-based approach as well:
- Autoscale when certain events are being pushed by Azure Event Grid to react instead of polling a specific metric
- Emit autoscaling events when actions are being started or finalized. That would allow subscribers to react on that instead of triggering a webhook. This also provides more extensibility where instead of only notifying one webhook, we can basically open it up for everybody who is interested in this
That said, I think having both a metric-based & eventing-based model would be the sweet spot as these support their own use-cases.
Conclusion
With Azure Monitor Autoscale it is really easy to define autoscaling rules that handling all the scaling for you, but you need to be careful with it. Having a good monitoring approach here is the key to success.
Every powerful tool comes with a responsibility.
Thanks for reading,
Tom
